Getting Started with List Processing
Introduction
The ArcaPix PixStor Python API provides effective methods for analysing PixStor filesystems, by combining the ease and flexibility of Python with the speed of PixStor’s parallelised data scanning.
With the ArcaPix API and as few as 4 lines of Python, it is simple to determine the amount of filesystem space used by temporary files, analyse high data usage by users, compare snapshots to find new or deleted files, report the average age of data, and more.
In addition, the ArcaPix PixStor Python API can combine list processing with other (third-party) libraries enabling tasks such as creating file analytics graphs (E.G. via MatPlotLib).
Background
The PixStor policy engine generates lists of the files on a filesystem and their attributes. PixStor can interrogate the filesystem metadata across many nodes in parallel, with many concurrent threads on each node, to scan files faster than a conventional (‘tree-walk’) recursive scan.
Traditional list processing with PixStor requires the creation of PixStor policies with LIST and EXTERNAL LIST rules. The file lists generated by the policy engine are passed to external scripts for post-processing.
The ArcaPix PixStor Python API simplifies this process.
Firstly, policies can be generated and run directly from the Python, removing the need for external policy files or standalone scripts.
Secondly, the API combines the actions of a list rule and an external list rule into a single object -
the ListProcessingRule.
Moreover, the API allows the definition of a (Python) processing function, which is passed to the list processing rule in place of an external script.
Thirdly, the API takes care of the boilerplate - loading and parsing the file lists that PixStor generates. In effect programmer’s only concern is the returned information.
Before You Start…
List Processing with the ArcaPix API requires only a basic knowledge of Python. An awareness of generators, serialisation (’pickling’) and lambda expressions is highly useful, but non-essential.
You can find more information on these Python topics in our ArcaPix API Almanac.
List Processing In Action
Say we want to know how much of our filesystem’s space is being used by temporary files. To begin, we create a
management policy object
>>> from arcapix.fs.gpfs import ManagementPolicy

>>> p = ManagementPolicy()
To work out the total amount of space used by the files matched by the policy engine, we use processing function which loops over those files and adds up their sizes
>>> def total_size(file_list):
...    result = 0
...    for f in file_list:
...       result = result + f.filesize
...    return result
The processing function will be given a generator (a collection) of a special type of object called an AttrDict.
Each AttrDict object corresponds to a file returned by the policy engine, and its attributes can be looked up as f.name, f.filesize, etc.
Now we create a list processing rule to apply the function
>>> from arcapix.fs.gpfs import ListProcessingRule

>>> r = p.rules.new(ListProcessingRule,
...                 listname  = 'size_list',
...                 processor = total_size )
Notice that we set the rule’s ‘processor’ equal to the function we just defined, but without its brackets.
In Python, functions are objects, which aren’t executed until ‘called’ - that is, referenced with brackets, such as total_size(file_list)
If we were to run the policy rule now, it would work out the total size for all files on the filesystem.
To restrict the processing to only temporary files (files with the ‘.tmp’ extension), we take advantage of rule criteria
>>> from arcapix.fs.gpfs import Criteria

>>> r.criteria.new(Criteria.like('name', '*.tmp'))
Now we can run our policy. To run the policy on filesystem mmfs1, we simply call
>>> p.run('mmfs1')

{'size_list': 123432}
This returns a dictionary with the rule’s ‘listname’ as the key, and the result of the list processing as the value. A policy with multiple list processing rules (executing multiple processing rules in parallel) returns a (key: value) entry for each rule.
MapReduce
We’ve seen how simple the ArcaPix API makes list processing. But the previous example doesn’t take full advantage of PixStor’s parallelism.
If the policy engine matches a large number of files, multiple sub-lists will be generated - each containing up to 8000 files, by default.
The previous, simple list processing example waits for all of these lists to be generated before any processing is done.
But with the ArcaPix API, each list can be processed as it is generated by taking advantage of the
MapReduceRule functionality.
Breaking Up Functions
MapReduce rules break the processing function into two parts
Map: Takes an AttrDict object and returns a value - often a particular file attribute or header Reduce: Combines each value returned by Map with a running ‘result’ - typically a simple addition operation is used
Ignoring parallelism, the effective MapReduce process works as follows:
1 2 3 | for f in file_list:
result = reducefn(result, mapfn(f))
return result
|
In the basic List Processing example (above), the total_size function looks up the ‘filesize’ attribute for each file in the lists,
then adds up those values to produce a total.
This same process can be split into two parts:
1 2 3 4 5 6 7 | def mapfn(f):
# look up the filesize
return f.filesize
def reducefn(val1, val2):
# add up two values
return val1 + val2
|
But why bother doing this?
Processing in Parallel
In the basic List Processing example, the total_size function needs all the lists to be generated before it can loop over them.
With separate map and reduce functions, each sub-list can be processed individually to give an intermediate result - and more importantly, multiple sub-lists can be processed at once in parallel.
Once all the sub-lists have been generated and processed individually, their intermediate results can be reduced once more to produce a single, final result for all the files found by the policy engine.
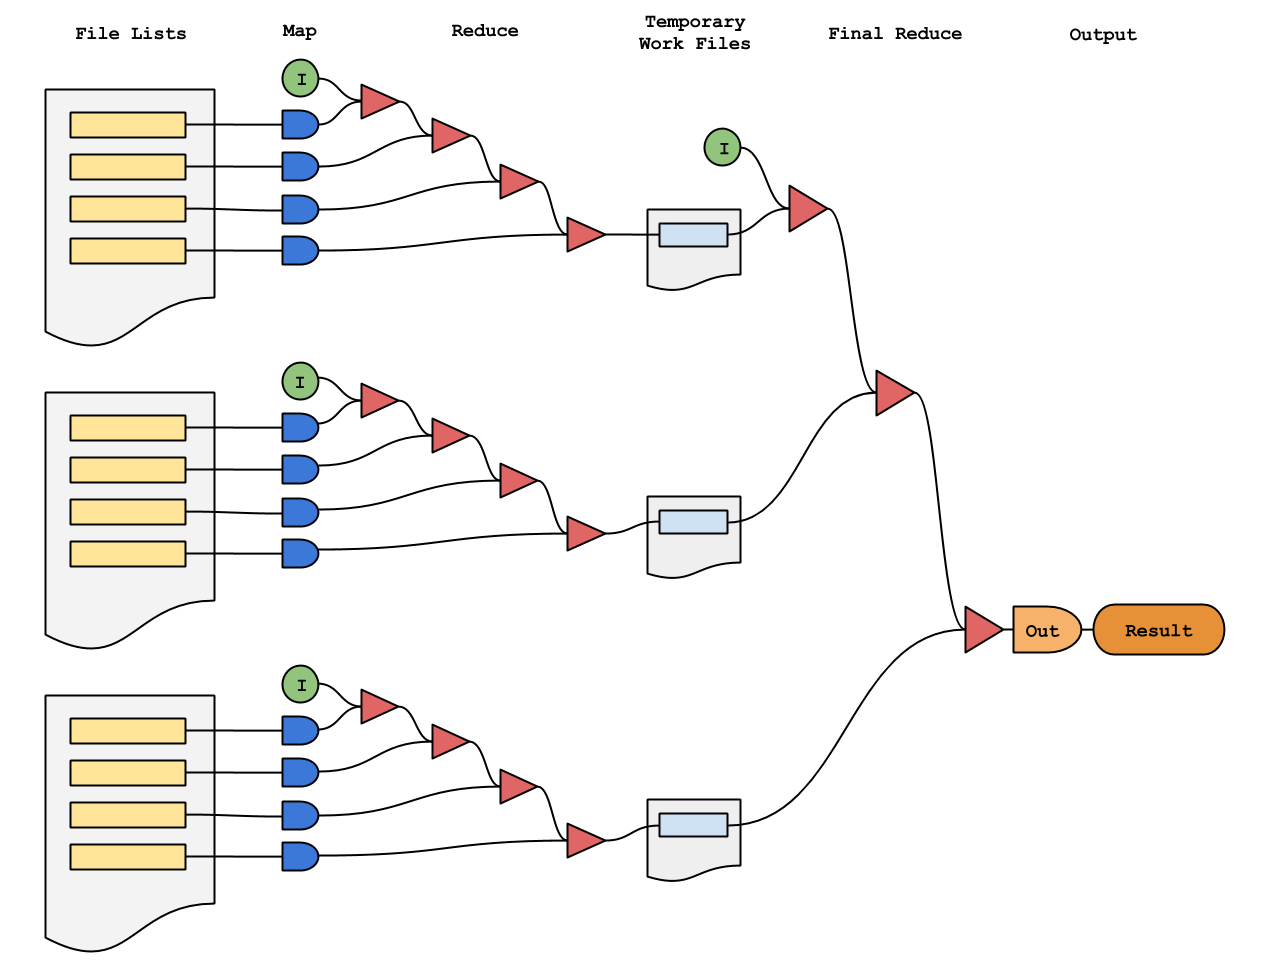
As an example - if we have 80,000 files, the basic list processing has to loop over (iterate) all these files one by one. The MapReduce methodology, however, would loop over 10 lists of 8,000 files concurrently, to produce 10 intermediate results. Each intermediate result is then looped over to produce the single final result.
That means basic list processing does 80,000 sequential operations, compared with an effective 8000+10 sequential operations for the equivalent MapReduce processing - an almost 10x speed increase.
Using PixStor’s default list processing settings, upto 24 lists can be processed concurrently, providing a best case speed increase of almost 20x, compared with the equivalent basic list processing.
MapReduce In Action
MapReduceRules are implemented in much the same way as ListProcessingRules. A management policy is created. Processing functions are defined. A rule is added to the policy. The policy is run.
>>> from arcapix.fs.gpfs import ManagementPolicy, MapReduceRule, Criteria

>>> p = ManagementPolicy()

>>> r = p.rules.new(MapReduceRule,
...                 listname = 'size_list2',
...                 mapfn    = lambda f: f.filesize,
...                 reducefn = lambda val1, val2: val1+val2)

>>> r.criteria.new(Criteria.like('name', '*.tmp'))

>>> p.run('mmfs1')

{'size_list': 123432}
Notice that the functions for map and reduce weren’t separately - we defined them ‘in-line’, using the special ‘lambda’ syntax. For simple functions, the lambda syntax lets us write more compact code; but writing the functions separately is equally valid.
Otherwise, the only difference between creating a ListProcessingRule and
creating a MapReduceRule is how the processing function(s) are defined.
See the API Alamanc for further discussion.
Post-Processing MapReduce
In most cases, a processing function can be refactored into map and reduce functions. Often the reduce function will performs a simple addition.
But occasionally, map and reduce alone can’t produce the required result. To work out an average of file sizes, it would be incorrect to use the reduce function
>>> def reducefn(x, y):
...     return (x + y) / 2
E.G. calculating the average of the list [1, 2, 3] by reducing with this function would give an incorrect result after the first iteration
>>> result = reducefn(1, 2)  # 1.5
>>> result = reducefn(result, 3)  # 2.25
Instead, an output function can be used to post-process the results of a MapReduce operation.
To work out the average of file size, we have the map and reduce functions produce the sum of file sizes and the total file count
1 2 3 4 5 | def mapfn(f):
return (f.filesize, 1)
def reducefn(val1, val2):
return (val1[0] + val2[0], val1[1] + val2[1])
|
Then an output function is used to divide the size by the count
6 7 | def output(result):
return result[0] / result[1]
|
Putting it together, and using lambda-style functions, the resulting MapReduce implementation is
1 2 3 4 5 | p.rules.new(MapReduceRule,
listname = 'averagesize',
mapfn = lambda x : (x.filesize, 1),
reducefn = lambda x,y : (x[0] + y[0], x[1] + y[1]),
output = lambda x : x[0] / x[1])
|
To take full advantage of the MapReduce paradigm, the map and reduce functions should do as much of the processing work as possible, and post-processing (output) should do as little as possible.
Tips and Tricks
Building Collections
To build a list of filenames, the initial approach might be to use Python’s standard list.append functionality.
However, due to the method by which the MapReduce rules work, a better approach exists.
By having the map function return each value as a single-membered list, the reduce function can simply be an addition as in the following implementation
1 2 3 4 5 | def mapfn(f):
return [f.filename]
def reducefn(x, y):
return x + y
|
Various collection types can similarly constructed.
To build a set of unique files owners, the following implementation could be used
1 2 3 4 5 | def mapfn(f):
return set([f.userid])
def reducefn(x, y):
return x | y
|
In all cases, the map function is required to return a single-membered collection of the appropriate type.
Counters
List processing provides an excellent method for enumerating file attributes. To aid in this, the Counter object from the Python
collections library can be used.
>>> from collections import Counter
To count how many files are owned by each user on a filesystem, a processor function can be defined:
1 2 3 4 5 | def count_users(file_list):
c = Counter()
for f in file_list:
c.update([f.userid])
return c
|
Alternatively, this can be implemented using MapReduce:
1 2 | mapfn = lambda f : Counter([f.userid])
reducefn = lambda x,y : x + y
|
Counters can also be used to find total sizes for different categories, E.G
To determine the amount of space used by different file types:
1 2 3 4 5 6 | def type_sizes(file_list):
c = Counter()
for f in file_list:
ext = os.path.splitext(f.pathname)
c.update({ext: f.filesize})
return c
|
To determine which user is using the most space on a filesystem:
1 2 3 | mapfn = lambda f : Counter({f.userid: f.filesize})
reducefn = lambda x,y : x + y
output = lambda result : result.most_common()
|
Here, the Counter object’s most_common() function is used to return the items in the Counter in descending count (size) order.
Determining Usernames
List processing returns file owners by numeric userid. To convert this value to a user name, the Python pwd library can be used.
>>> pwd.getpwuid(f.userid)[0]  # f.userid = 0
'root'
Similarly, to look-up group names from a groupid, the Python grp Library can be used.
It is advised to cache the names, otherwise performance is likely to be affected by repeated lookups.
Time-Based Attributes
File access time, creation time, and modification time are automatically converted to Python datetime objects.
To calculate the age of a file (in days), a method can be used as follows:
>>> from datetime import datetime
>>> (datetime.today() - f.creation).days
13
The year a file was last accessed can be determined as:
>>> f.access.year
2016
Refer to the Python datetime documentation page for more information.
Directories Plus
The default setting for the policy engine ensures only ‘regular’ file objects are returned.
To include directories and symlinks in search results, enable the ‘directories plus’ option with the
Rule change method
>>> r.change(directories_plus=True)
Run Options
PixStor’s default policy execution values specify processing of 100 files per thread and 24 threads per node.
In most cases the PixStor maxFiles parameter is vastly conservative and should be increased by orders of magnitude.
For that reason, the default maxFiles has been changed to 8000 files per thread in the ArcaPix API.
But, while greater processing performance will be observed with higher numbers of files and threads,
if the cluster performance is impeded by policy processing it is advised to decrease the threadLevel parameter.
It is advised to start with a smaller value for threadLevel and increase until the optimum balance between List processing and performance is determined.
These options can be changed as part of the policy.run function:
>>> p.run('mmfs1', maxFiles=250, threadLevel=10)
Use the nodes parameter to specify one or more nodes, or a nodeclass on which to run policies. By default policies are run on the local node only.
Use the cleanup parameter to specify whether the temporary workfiles are removed after policy execution. Keeping workfiles can be useful for debugging.
Refer to the main Policy documentation page for more information.
Warnings and Caveats
API Policy Dependecies
The API can be used to export policies as PixStor-compatible text files in order to backup or share them, as the API can easily reload these files.
However using a policy produced via the API natively (I.E. via the mmapplypolicy command) will fail to execute if the API isn’t installed.
An example of an API policy is given below; it invokes the policydriver on any specified node(s) upon which the API is installed.
RULE 'mr_unnamed_c11f7868' EXTERNAL LIST snapshot-search EXEC '/usr/bin/python /opt/arcapix/pythonapi/arcapix/fs/gpfs/policydriver.py'
OPTS 'eJyFjbtOwzAYRn+nQIO5lNvEwtoOydBW7VJ1gc1ShyCPJTKOCyaO048mKqBGYim8NrcHYD1HR+c90NqVdRavzLNVzr6pypY+/mVLq3NneLqwzqWL2usfxUHd
/5NC5SZd5eav42DamzXXZWY4gq5gIhAtcS0vH4g2RDfzDjWMNoyeiO4CQptu0ZptsSPD77nxqjDY3WJPshe0JbMIP7AvryZ2+Vo9lj6yfllX0WgQjbUeDLUZjkf9
/hRchhOnivtMTXEgmCQc9noVjhIcC2rQ+cRJgtMGZ7M5zhtcVEn8BT4OVJo=e1ea6883ad53e6a57c565a9b110a65d4 snaptest-c11f7868'

RULE 'unnamed_c11f7868' LIST 'snapshot-search'
 SHOW(' pathname=' || varchar(PATH_NAME))
In such instances where the policy is invoked manually, the policydriver creates workfiles which require further processing to produce a result.
$ cat -v snapshot-search-c11f7868-15774.F94FF09C.1.out
M-^@^Bccollections
Counter
q^@}q^A(U^Q/mmfs1/.policytmpq^BMM-)2U^F/mmfs1q^CMM-)2uM-^Eq^DRq^E.
It is therefore recommended to utilise the API directly, since it provides all such functionality.
Temporary Files
All temporary files are witten to /<filesystem_mount_point>/.policytmp by default.
If you do not have permission to write to this directory, your policies will fail.
To change where temporary policy files are written to, use the
filesystem.setTempFilePath method, E.G.
>>> from arcapix.fs.gpfs.filesystem import setTempFilePath
>>> setTempFilePath('/tmp')
This will change the temporary file path for the particular session in which it was called.
To change where temporary work files are written to, use the localWorkDirectory or
globalWorkDirectory options with ManagementPolicy.run, E.G.
>>> p.run('mmfs1', localWorkDirectory='/tmp')
Initial Values
MapReduce rules can be specified with an initial value. In most cases specifying an initial value is not necessary. If the initial value is omitted, the value returned by the first call to ‘map’ will be utilised as the initial value.
However, if the policy engine matches no files and initial value is omitted the result of the MapReduce is None.
None Values
The API converts Files or folders with an attribute value of NULL (such as the creation time for a filesystem’s root folder) to a value of None.
Similarly, if the policy engine matches no rules and an initial MapReduce value has not been specified the return value will be None.
Code should be designed to be able to handle these None values, or else errors may result.
Escaping
The escape option can be used to sanities file names which contain unusual characters.
For most cases, the escape string '%/+@#= .:' works well
>>> rule = p.rules.new(MapReduceRule, 'files', lambda f: [f.path])
>>> rule.change(escape='%/+@#= .:')
The unqote function (from urllib in python2 and urlparse in python3) can then
be used to ‘un-escape’ the results. For a MapReduceRule,
a good place to do this is in the output function.
>>> rule.change(output=lambda x: [unquote(f) for f in x])
Note - When using the escape option, be sure to always include the space character (’ ‘),
or else you will get parsing errors during list processing execution.
Examples
The below examples are presented in their simplest working form. It is left as an exercise for the user to extend the examples appropriately. E.G. implement Exceptions to catch values of ‘None’. For further information refer to Warnings and Caveats.
Find the Difference Between Two Snapshots
By default, a list processing rule will not match data contained within filesystem snapshots (files in the .snapshots folder).
>>> p.run('mmfs1')
In order to match files from a snapshot, the policy needs needs to be run with the snapshot flag:
>>> p.run('mmfs1', snapshot='global-snapshot')
To determine the difference between two snapshots, a list processing rule can be used to scan the snapshots and return file lists in the form of Python sets
1 2 3 4 5 6 7 8 9 10 11 12 13 14 15 16 17 | from arcapix.fs.gpfs import ManagementPolicy, MapReduceRule
# list processing helper function
def helper(f):
# compare files by name / path name / creation time
# pathname.split(...) removes the snapshot directory part of the path
return [(f.name, f.pathname.split('/', 4)[-1], f.creation)]
p = ManagementPolicy()
p.rules.new(MapReduceRule, 'snap', mapfn=helper, output=set)
p.rules.change(directories_plus=True) # include folders, etc.
# find files from snap 1 - CHANGE THIS NAME to an existing snap
oldSnap = p.run("mmfs1", snapshot="old-snap")['snap']
# find files from snap 2 - CHANGE THIS NAME to an existing snap
newSnap = p.run("mmfs1", snapshot="new-snap")['snap']
|
We can then find differences between the snapshots as
18 19 | deleted = sorted(i[0] for i in (oldSnap - newSnap))
created = sorted(i[0] for i in (newSnap - oldSnap))
|
In the above example (oldSnap-newSnap) returns the files and directories in set oldSnap minus any files and directories
that are present in both oldSnap and newSnap. Therefore the values returned to list deleted are files and directories
that have been deleted from the filesytem between the creation of snapshots old-snap and new-snap.
Similarly, (newSnap-oldSnap) returns the files and directories in set newSnap minus any files and directories
that are present in both newSnap and oldSnap. Therefore the values returned to list created are files and directories
that have been added to the filesytem between the creation of snapshots old-snap and new-snap.
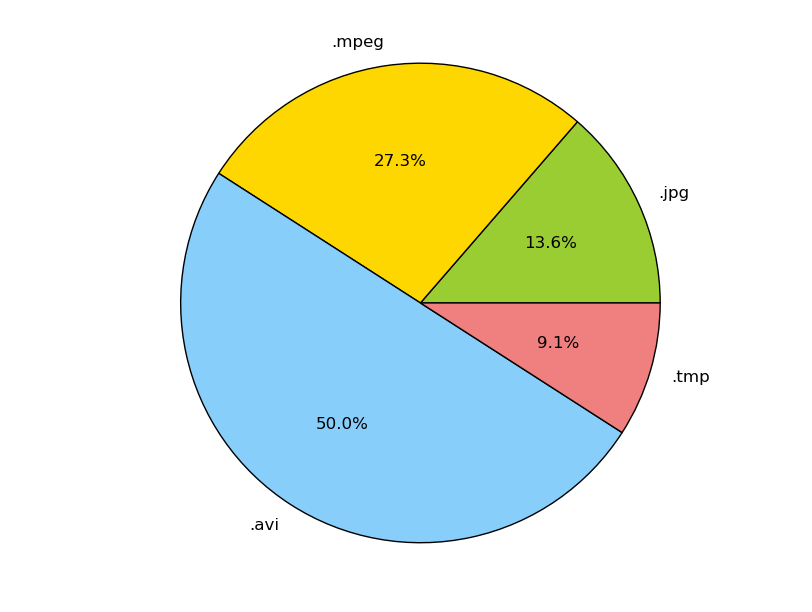
Plot a Pie Chart of Space Usage by File Type
To plot a pie chart displaying the disk space used by different file types, a ListProcessingRule can be used with the third-party library MatPlotLib
1 2 3 4 5 6 7 8 9 10 11 12 13 14 15 16 17 18 19 20 21 | from arcapix.fs.gpfs import ManagementPolicy, ListProcessingRule
import matplotlib.pyplot as plt
from collections import Counter
from os.path import splitext
p = ManagementPolicy()
def type_sizes(file_list):
c = Counter()
for f in file_list:
c.update({splitext(f.name)[1]: f.filesize})
return c
r = p.rules.new(ListProcessingRule, 'types', type_sizes)
result = p.run('mmfs1')['types']
plt.pie(result.values(), labels=result.keys(), autopct='%1.1f%%')
plt.axis('equal')
plt.show()
|
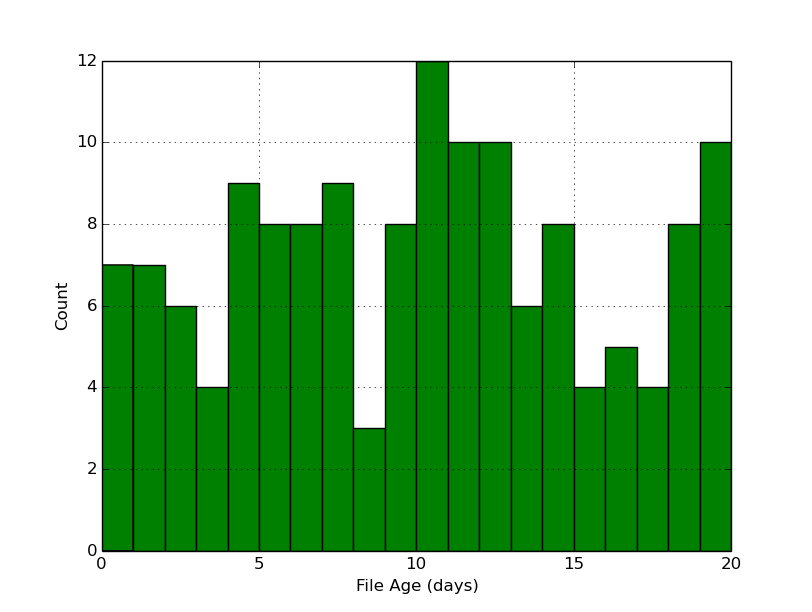
Plot a Histogram of File Ages
To plot a histogram displaying the distribution of the ages of files on the system using a MapReduceRule and MatPlotLib:
1 2 3 4 5 6 7 8 9 10 11 12 13 14 15 16 17 18 19 | from arcapix.fs.gpfs import ManagementPolicy, MapReduceRule
import matplotlib.pyplot as plt
from datetime import datetime
p = ManagementPolicy()
def file_age(gen):
return [(datetime.today() - f.creation).days]
p.rules.new(MapReduceRule, listname='age', mapfn=file_age)
h = p.run('mmfs1')['age']
plt.hist(h, max(h), facecolor='green')
plt.xlabel('File Age (days)')
plt.ylabel('Count')
plt.grid(True)
plt.show()
|
Print a List of Directory Sizes
A typical requirement for large clusters is to determine the total disk space utilised for each directory and sub-directory in the filesystem. E.G.
/mmfs1                         37176
/mmfs1/.Trash-1001              1794
/mmfs1/.Trash-1001/files        1513
/mmfs1/.Trash-1001/info          281
/mmfs1/data                    35382
In the above example the file /mmfs1/data/example.txt will contribute to the total size returned for folders /mmfs1/data/ and also /mmfs1/.
Each file path is required to be iterated, adding the file’s size to the running totals for each sub-paths. To determine the total size allocated for each directory, the Counter object can be used. Refer to the Python collections for more information.
A sample implementation follows:
1 2 3 4 5 6 7 8 9 | def mapfn(f):
c = Counter()
path = f.pathname.split('/')
# ['', 'mmfs1', 'data', 'example.txt']
for i in range(2, f.pathname.count('/') + 1):
subpath = '/'.join(path[:i])
# '/mmfs1', '/mmfs1/data/'
c.update({subpath: f.filesize})
return c
|
By utilising Counters the default reduce function - addition - can also be used.
1 2 3 4 5 6 7 8 | from arcapix.fs.gpfs import ManagementPolicy, MapReduceRule
from collections import Counter
p = ManagementPolicy()
p.rules.new(MapReduceRule, 'dir_sizes', mapfn)
result = p.run('mmfs1')['dir_size']
|
The results can be formatted as follows:
9 10 11 12 13 | from __future__ import print_function
maxpathlen = max(len(x) for x in result.keys())
for (name, size) in sorted(result.items()):
print(name.ljust(maxpathlen), str(size).rjust(10))
|
Note: directories which don’t contain any files will not be included in the resulting directory size listing.
It has been left as an exercise for the user to implement a version of above wherein a file is only
counted for its imediate directory, not all of its parent directories - E.G. The size of file
/mmfs1/data/example.txt contributes to the total size for /mmfs1/data only.